Key Takeaways
- Declutter and depersonalize completely before any staging decisions are made
- Float furniture away from walls and orient seating around one clear focal point
- Apply the 60-30-10 color rule for a cohesive palette that still feels warm and lived-in
- Get lighting, scale, and focal point right — these three details separate strong staging from forgettable results
- DIY staging suits occupied homes with the right furniture already in place; professional staging pays off at higher price points
How to Stage Your Living Room: Step-by-Step
Step 1: Declutter, Depersonalize, and Deep Clean
Remove everything personal first : family photos, children's artwork, religious or political decor, pet accessories, and personal collections. Buyers need to mentally place themselves in the space, which requires a neutral starting point that doesn't feel claimed.
Clear all horizontal surfaces to near-empty: coffee tables, shelves, mantels. Then selectively return only impersonal, curated items. One important caution: don't simply relocate clutter to drawers or closets. Buyers open storage spaces, and an overstuffed closet signals a storage problem just as clearly as a crowded shelf.
Deep clean carpets, windows, floors, and baseboards. Address pet and cooking odors before the first showing — scent registers immediately, shaping buyer perception before they've consciously noticed anything else.
Step 2: Repair Walls and Refresh Paint
Patch all visible wall damage (nail holes, scuffs, hairline cracks) and repaint in a neutral tone. Warm whites, light grays, and soft greiges work well because they're broadly appealing, photograph cleanly, and don't compete with furniture or decor.
Fresh paint is one of the highest-return pre-sale investments a seller can make. Beyond walls, inspect and repair:
- Electrical outlets and light switch plates
- Light fixtures (replace any that are dated or broken)
- Windows (clean, open smoothly, no broken seals)
- Doors (no sticking, squeaking, or misaligned hardware)
Any visible functional issue causes buyers to question what else may be broken. Minor repairs carry weight well beyond their cost.
Step 3: Edit and Arrange Furniture Strategically
Remove excess pieces first. Professional stagers routinely remove half of a room's existing furniture. The goal is a space that reads as open and intentional, not a showroom with every available piece on display. For most living rooms, the right edit leaves:
- A sofa as the primary anchor
- A coffee table centered on the seating group
- One or two accent chairs
- A single side table
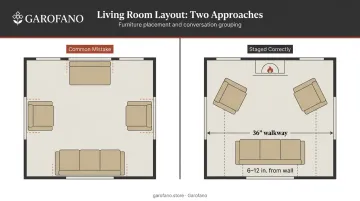
Float furniture away from the walls. Pushing pieces to the perimeter is one of the most common spatial mistakes in DIY staging. According to Architectural Digest's design experts, bringing furniture 6–12 inches forward from walls creates a more connected, conversational grouping and prevents the empty, disconnected center that perimeter-only layouts produce.
Arrange seating to face a clear focal point (a fireplace, feature window, or statement wall) with a walkway of at least 36 inches along main traffic paths.
Scale and silhouette matter as much as style. Pieces built around low profiles, horizontal proportions, and restrained upholstery — Garofano's sofas are designed on exactly these principles — photograph without visual noise and make rooms feel considered rather than simply filled.
Step 4: Optimize Lighting
Natural light should be maximized first: remove heavy drapes or pull them fully back, clean windows inside and out, and position mirrors opposite windows to push light deeper into the room.
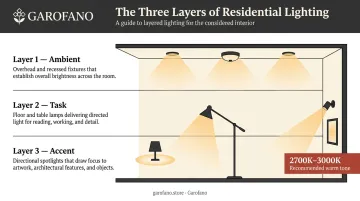
Then layer three types of artificial lighting:
- Ambient — overhead or recessed fixtures providing general illumination
- Task — table and floor lamps adding focused light where needed
- Accent — directional light highlighting architectural features or artwork
Warm-toned bulbs in the 2700K–3000K range create the soft, inviting atmosphere associated with high-end staged interiors, according to Architectural Digest lighting guidance. Avoid relying solely on overhead lighting : it flattens a room and eliminates the visual warmth that makes spaces feel livable in person and in listing photos.
Step 5: Add Curated Decor and Sensory Details
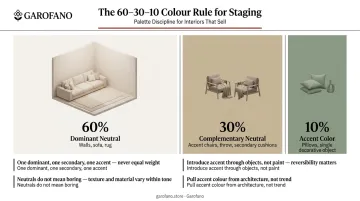
Apply the 60-30-10 rule when layering textiles and decor: 60% dominant neutral (walls, sofa, rug), 30% complementary neutral (accent chairs, throw, secondary cushions), 10% accent color in small doses through pillows or a single decorative object.
For accessories, group items in odd numbers (threes work especially well) at varying heights. A tall vase, a mid-height bowl, and a low tray create visual rhythm without symmetry feeling static. Natural elements like potted plants or fresh flowers add warmth without personal identity.
Garofano's Decor Collection offers purpose-built vignette pieces in travertine, marble, and volcanic stone. A simple three-piece grouping works well across coffee tables and consoles: the Candeliere Travertino Alto ($275) for height, the Centrotavola Laguna Bianca ($209) as a horizontal mid-element, and the Coppa Travertino Serena ($209) as a low anchor. creates a cohesive, staging-ready arrangement across coffee tables and consoles alike.
Scent deserves the same attention as any visual element. Fresh flowers or a subtle diffuser near the entry point are enough — buyer first impressions register smell before they register much else.
What You Need Before You Start Staging
Staging decisions made before the room is repaired and clean produce inconsistent results. No amount of decor compensates for visible damage, lingering odors, or surfaces in poor condition.
Baseline Condition Checklist
Before placing a single piece of decor, confirm:
- Walls: patched and repainted in a neutral tone
- Flooring: cleaned, refinished if needed, no damaged areas
- Outlets and switches: functioning and updated
- Windows: clean, operational, no fogged glass
- Doors: aligned, functional hardware
- HVAC vents and ceiling fixtures: dust-free and in good condition
Furniture and Decor Inventory
Walk the room and sort existing furniture into three categories:
- Keep pieces that are appropriately scaled and neutral in color and style
- Remove anything oversized, mismatched, or too personalized
- Identify gaps that need filling for the room to feel complete
A mismatched piece that disrupts the room's visual logic should be removed even if it leaves the space with fewer items. Buyers respond to rooms that feel intentional — not rooms that feel full.
Budget and Timeline
Professional staging costs vary considerably by scope:
| Scope | Typical Range |
|---|---|
| Consultation only | $150–$600 |
| One professionally staged room | $300–$700/month |
| Whole-home professional staging | $832–$2,917 (national average ~$1,849) |
Source: Angi 2026 staging cost data
DIY costs depend on what needs replacing — cleaning, paint, selective decor additions — but no reliable all-in benchmark exists. Build your budget from specific line items rather than a round number estimate.
Once your budget is set, build in enough time to execute it properly. Staging completed two or three days before listing shows — rushed arrangements, mismatched additions, and overlooked repairs are visible to buyers and agents alike.
Key Variables That Determine Staging Success
Two rooms staged with the same effort and budget can produce very different buyer reactions. Outcomes are driven by specific design variables, not effort alone.
Furniture Scale and Proportion
Oversized furniture compresses a room visually; undersized furniture makes it feel undefined. Right-sized furniture allows clear walkways (minimum 36 inches on main paths) and leaves the room feeling full without crowded.
Pieces with refined proportions — low profiles, horizontal silhouettes, clean upholstered bases — read well in listing photography and in person. Buyers form spatial judgments in seconds; wrong-scale furniture skews that perception before they've processed a single feature.
Focal Point Clarity
Every well-staged living room needs one clear visual anchor — a fireplace, feature window, quality sofa, or piece of artwork — that draws the eye. Furniture arrangement either reinforces or undermines this focal point.
A room without a clear anchor feels disjointed. Buyers move through it without connecting emotionally — and a room they can't connect to is a room they won't remember.
Lighting Quality
Flat or insufficient lighting is one of the most common reasons a well-decorated room fails to photograph well. According to NAR's staging research, 73% of buyers' agents said listing photos were more or much more important to clients. Lighting quality directly shapes how those photos land.
Layer ambient, task, and accent sources. Use warm-toned bulbs (2700K–3000K). Replace burned-out bulbs before every showing.
Color Palette Discipline
Neutral walls paired with deliberate accent color distribution create broad appeal without sterility. Accent colors should be consistent across all textiles and decor. A few targeted principles keep the palette cohesive:
- Repeat accent colors in at least two locations (pillows, a throw, a vase)
- Limit the active palette to two or three colors beyond the neutral base
- Avoid warm and cool accent tones in the same room — they compete rather than complement
- Swap patterned or loud textiles for solid, neutral alternatives before showings
Common Staging Mistakes and How to Fix Them
Most staging failures trace back to the same handful of mistakes. Knowing what they are — and why they undermine a showing — makes them easy to avoid.
Pushing furniture against walls — Moving pieces to the perimeter actually makes rooms feel smaller and more disconnected. Bring furniture 6–12 inches forward and arrange it in conversational groupings anchored to a focal point.
Over-personalization or under-decoration — Too many personal items prevent buyers from mentally moving in; bare surfaces make the room feel cold and hard to read. Aim for hotel-level curation — impersonal, warm, and visually complete without looking staged.
Neglecting lighting and scent — Burned-out bulbs, dark corners, and stale air register immediately — buyers may not name it, but they feel it. Replace all bulbs, layer ambient and accent lighting, and address any odors before the first showing.
Mismatched or disproportionate furniture — Staging with whatever is on hand, regardless of cohesion, produces a disjointed result that reads as unfinished. Edit ruthlessly — a room with fewer well-matched pieces presents far better than a full room of unrelated furniture.
Professional Staging vs. DIY: What's Right for Your Home?
The right choice depends on the home's price point, the seller's design instincts, and the existing furniture setup.
When Professional Staging Is Worth It
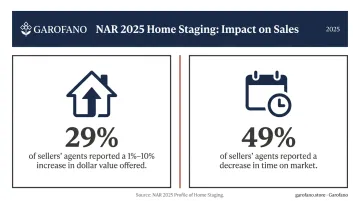
For higher-value listings, luxury properties, or vacant homes, professional staging typically delivers a measurable return. According to the 2025 NAR Profile of Home Staging, 29% of sellers' agents reported that staging produced a 1%–10% increase in dollar value offered, and 49% reported a decrease in time on market. Professional stagers also bring furniture sourcing networks and a trained understanding of buyer psychology that's hard to replicate on your own.
When DIY Staging Works
Sellers with a cohesive, neutral existing furniture setup can achieve strong results following the steps in this guide. DIY works best when:
- The home is occupied with appropriately scaled furniture
- The existing palette is already neutral or close to it
- The listing is in the mid-range market segment
- The seller has a design-aware eye and time to execute carefully
If neither option fits cleanly, a middle path is worth considering.
The Hybrid Approach
Many sellers benefit from a one-time professional consultation — typically $150–$600 — combined with self-executed changes. The consultant addresses the decisions with the highest stakes: focal point, furniture scale, and lighting. Everything else, the seller handles independently.
For sellers who need to replace or supplement existing pieces, the furniture itself becomes a meaningful part of the equation. Garofano's curated collection — Italian-inspired sofas, dining tables, accent pieces, and rugs — is built around the neutral palettes and refined proportions that photograph well and appeal to a broad buyer pool. Browse the full collection at garofano.store or reach out directly at info@garofano.store.
Frequently Asked Questions
What is the 2/3 rule for living rooms?
The 2/3 rule refers to rug sizing: the area rug should cover approximately two-thirds of the main seating area, grounding the furniture grouping visually without overpowering the room or interrupting traffic flow.
What is the 3-5-7 rule in interior design?
The 3-5-7 rule guides decorative object arrangements in odd-numbered groupings of three, five, or seven items. Within each group, vary height, texture, and scale to create visual rhythm without relying on perfect symmetry.
Should a living room be furnished or empty when selling?
Furnished and staged consistently outperforms vacant. According to NAR's 2025 data, 83% of buyers' agents said staging made it easier for buyers to visualize a property as a future home. Empty rooms are harder to scale mentally and fail to create the emotional warmth that drives purchase decisions.
How much does it cost to stage a living room?
A professional consultation runs $150–$600; a fully staged room typically costs $300–$700 per month in furniture rental and labor. For DIY, the main line items are paint, cleaning, and selective decor additions — costs vary by what needs replacing and the property's market.
Does staging actually help sell a home faster?
Yes. NAR's 2025 survey found that 49% of sellers' agents reported staging slightly or greatly reduced time on market. The effect is consistent across agent observations and property types.
What colors should you avoid when staging a living room?
Avoid highly saturated or polarizing tones — deep reds, bright oranges, bold greens. These narrow buyer appeal and can dominate listing photos. Stick to warm neutrals for walls and large surfaces, with accent colors appearing only in small doses through textiles and accessories.